Toolbars in PDFill PDF Editor


Frequently accessing tools through the menu bar is cumbersome. PDFill PDF Editor has floating toolbars which you can make visible for easy access to frequently used tools. You can drag the toolbars to any location in the PDFill window so as not to obstruct your view of the document. There are 10 toolbars:

1. Standard Toolbar
2. View Toolbar
3. Document Toolbar
4. Format Toolbar
5. Form Toolbar
6. Comment Toolbar
7. Drawing Toolbar
8. Align Toolbar
9. Ink Toolbar
10. Navigation Toolbar

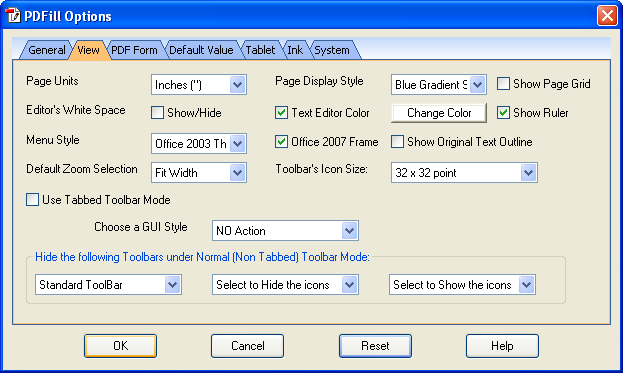
From PDFill Options => View Tab, you can use Tabbed Toolbar Mode, change icon sizes and hide some of toolbars and its icons to gain a better view of the PDF document.

Tabbed Toolbar Mode:

Tabbed Toolbars contain all the functionality of normal toolbars however Tabbed toolbars eliminate the need for the toolbars to be crowded by organizing them into a single Tabular Toolbar.

        Normal Toolbar Mode:

Tabbed Toolbar Mode:

Toolbar's Icon Sizes:  

16 x 16 point:

24 x 24 point:

32 x 32 point:

Simple GUI for PDF Form Filler:

The tool bar mode will be switched to normal. All the toolbars except Standard and View Toolbars are hidden. This is good for the fillable PDF Form Filling. All the PDF Editing Toolbars are not available.

10 PDFill Toolbars:
1. Standard Toolbar:

Open new PDF Project New project to open a new PDF File for editing. See How to Quick Start PDFill.
Open Project to resume editing Open an existing project to resume the former editing
Save Project  for later editing Save current editing into a project file for the future editing
Save the edited PDF As Save the edited information back to the original PDF file to have a new PDF. See detail in Save the edited PDF locally with options.
Print the edited PDF Print the edited PDF from Adobe Reader. If you have problem to print, please use "Save the edited PDF As", then open this new PDF inside Adobe Reader and Print it from the Reader.
Save and Email the edited PDF Save and Email the edited PDF. See detail in Save the edited PDF locally with options.
Cut Cut the selected text inside the current editor into clipboard; Cut Inserted Object for Paste into the different page
Copy Copy the selected text inside the editor into clipboard; Copy Current Object to the different page
Paste Paste the text/Image inside clipboard to the current editor; Paste Inserted Object
Set as Default Set the current object as the default so that the next new object with the same will have the same properties.
Undo PDFill Objects Undo PDFill Objects
Redo PDFill Objects Redo PDFill Objects
Spell Checker Spell Checker the current Text Object
Import Image from Scanner Scan Paper form into PDFill to create a new PDF. There are 3 options: Select Source, Acquire and Scanner Page Setting. See detail in PDF Scanner.
PDFill Options Set the Options for PDFill PDF Editor. You will see the following dialog with 7 tabbed views: General, View, PDF Form, Default Value, Tablet, Ink, System.
The conversion among PDFill FREE PDF Editor Basic,   Professional Version and Enterprise Version

2. View Toolbar:

Refresh Redraw the current PDF page inside PDFill
First Page Go the fist page of the document
Previous Page Go to the previous page of the document
Page Selection Select the specified page of the document
Next Page Go to the next page of the document
Last Page Go to the last page of the document
Zoom In ý Increase the magnification percentage of the document view
Zoom Selection Select the magnification percentage of the document view.
Zoom Out Decrease the magnification percentage of the document view
Actual Size Set the document magnification level to 100%.
Fit in Window Resize the page to fit entirely in the window
Fit in Width

Resize the page to fit the width of the window

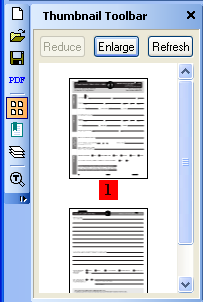
Thumbnail View

Thumbnails View

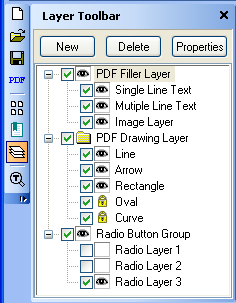
Layer View

Create new PDF Layer for PDF Document.

Pan If Set, Hold and Drag the left Button to Pan; To enter the editing state, need to unselect.
Marquee Zoom Tool Drag a rectangle around a portion of the page to zoom into this area Or Click to increase the magnification
Dynamic Zoom Tool Zoom in when you drag it up the page and zoom out when you drag down
Page Down Scroll down in document page
Page Up Scroll up in document page
PDFill Options Set the Options for PDFill PDF Editor. You will see the following dialog with 7 tabbed views: General, View, PDF Form, Default Value, Tablet, Ink, System.

3. Document Toolbar:

Insert New Blank PDF Page After Current Page Insert Blank Page After Current Page
Insert New Blank PDF Page Before Current Page Insert Blank Page Before Current Page
Delete Current Page Delete Current Page
Delete or Renumber PDF Page Delete or Renumber Pages

Operations on Pages Insert PDF Pages with Interleaving Option
Extract PDF Pages
Replace PDF Pages
Rotate Page
Crop Pages
Crop Pages Visually
Page Action
Rotate Page Clockwise
Rotate Page Counterclockwise
Add PDF Bookmark Create new PDF bookmark from scratch, read your PDF bookmarks into PDFill for editing
Add PDF Header and Footer and Bates Number ... Add PDF header, footer and Bates information that is used to present information, such as date, time, page numbers, or the title of the document, in the top or bottom margins of a document

Watermark Add PDF Watermark by Text
Add PDF Watermark by Image
Add PDF Watermark by PDF Page
Attach A File into PDF Document Attach any type of files to a PDF in a document level
Add JavaScript into PDF Document Create document-level JavaScript actions that apply to the entire PDF document
Add a Digital Signature into PDF Document Create document-level Digital Signature that applies to the entire document.

Select a File for More Operations Add Bates Numbering into PDF Document
Extract Pages
FREE PDF Optimizer
FREE PDF Extract Text
FREE PDF Extract Image
FRRE PDF OCR

4. Format Toolbar:

Select to Edit Click left mouse button to enter the selection state to edit the selected object.
Insert Single Line Text Click left mouse button to the baseline of the new single line text to insert a SingleLine Text.
Insert Multiple Line Text Drag the left mouse button to draw a text area to insert MultipleLine Text.
Insert Check Box Click left mouse button to the center of a check box to insert a Check Box.
Insert Image or PDF Drag the left mouse button to draw an area to insert an Image or a PDF Page.

Signature Image from File
Image from File
Image from Clipboard
Import Image from Scanner
Insert PDF Page like Image
Use Saved PDFill Objects

Insert Hyperlink Drag the left mouse button to draw an area to insert a Hyperlink.
Insert Whiteout Drag the left mouse button to draw an area to insert a Whiteout.
Insert Highlight Drag the left mouse button to draw an area to insert a Highlight.
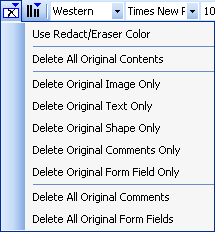
PDF Redaction/Eraser Use Redaction / Eraser Color
Delete All Original Comments
Delete Original Image Only
Delete Original Text Only
Delete Original Shape Only
Delete Original Comments Only
Delete Original Form Field Only
Delete All Original Comments
Delete All Original Form Fields
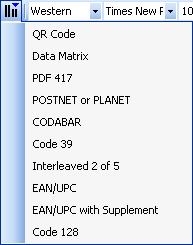
PDF Barcode

QR Code
Data Matrix
PDF 417
POSTNET or PLANET Barcode
CODABAR Barcode
Code 39 and Code 39 Extended Barcode
Interleaved 2 of 5 Barcode
EAN/UPC Barcode
EAN/UPC with Supplement Barcode
Code 128 Barcode
Font Encode Click here to see the listed links to international graphical representations, and textual listings, of each of the Windows codepages that PDFill supports.
Font Name Some font is empty for the selected Font Encode. You must play with several fonts to see if it works inside PDFill.
Font Size The size of the Font
Font Style Font Regular, Bold, Italic and Bold Italic.
Font Transparency The transparency of the text
Font Color The color of the text. You can pick up a color inside the PDF Page.
Text Alignment Text Alignment:  Left
Text Alignment Text Alignment:  Center
Text Alignment Text Alignment:  Right
Text Alignment Text Alignment:  Justify
Show  and Hide If set, the space char inside a string will be replaced by a dot in the display.
PDFill Object Properties Edit Current PDFill Object's Properties

5. Forms Toolbar:

Select to Edit

Click left mouse button to enter the selection state to edit the selected object.

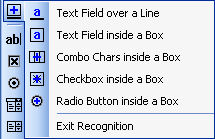
Form Field Recognition by Clicking Recognize PDF form fields by clicking, making it faster and easier to create dynamic forms in PDF.
Text Field Tool Draw area to insert a new text form field. A Text PDF field is a box or space in which the user can enter text from the keyboard.
Check Box Tool Draw area to insert a new check box field. A check box field represents one or more check boxes that toggle between two states, on and off, when manipulated by the user with the mouse or keyboard.
Radio Button Tool Draw area to insert a new radio button field. A radio button field is a set of related buttons.
Combo Box Tool

Draw area to insert a new combo box field. A combo box consisting of a drop-down list optionally accompanied by an editable text box in which the user can type a value other than the predefined choices.

List Box Tool Draw area to insert a new List box field. A scrollable list box in which the user can pick up a value and then this value will be highlighted among one or many displayed options.
Push Button Tool

Draw area to insert a new push button form field. A push button is a purely interactive control that responds immediately to user input without retaining a permanent value.

Digital Signature Tool Draw area to insert a new Digital Signature form field. A digital signature form field lets the end user insert a digital signature using the free Adobe Reader 11.
Tab Order Tab Order by Clicking, Table or Auto
Table Tool Table Tool to Place Multiple Fields in rows and columns.
Adjust Box Height Adjust Field Box Height by Font Size.
Calculation Order Set New Field Calculation Order.
Align Tools to precisely Align Field's Position Show or Hide the Align Toolbar to align field's position precisely.
PDFill Object Properties Edit Current PDFill Object's Properties.

6. Comment Toolbar:

Select to Edit Click left mouse button to enter the selection state to edit the selected object.
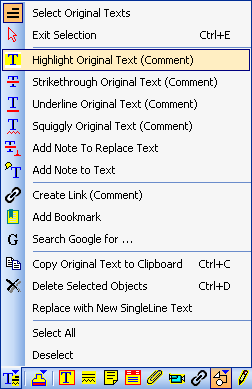
Select Original Texts
Exit Selection.
Copy Original Text to Clipboard (FREE)
Delete Selected Objects
Replace with a Single Line Text
Highlight Original Text (FREE Comment)
Strikethrough Original Text (FREE Comment)
Underline Original Text (FREE Comment)
Squiggly Original Text (FREE Comment)
Add Note To Replace Text (FREE Comment)
Add Note to Text (FREE Comment)
Create Link (FREE Comment)
Add Bookmark
Search Google for (FREE)
Select All
Deselect
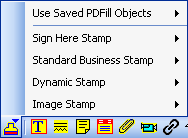
Stamp Tool

Click to select a Stamp Tool:

Use Saved Objects
Sign Here Stamps
Standard Business Stamps
Dynamic Stamps
Image Stamps

Text Box Tool Drag the left mouse button to draw area to Draw a Text Box.
Highlight Tool Drag the left mouse button to draw area to Draw a Highlight.
Sticky Note Tool Drag the left mouse button to draw area to Draw a Sticky Note.
Popup Note Tool Drag the left mouse button to draw area to Draw a Sticky Note.
File Attachment Tool Drag the left mouse button to draw area to Draw a Popup Note.
Video Play Tool Drag the left mouse button to draw area to play a video.
Link Tool Drag the left mouse button to draw area to add a URL link.
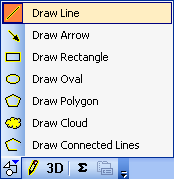
Line Tool Draw Line Comment.
Arrow Tool Draw Arrow Comment.
Rectangle Drag the left mouse button to draw area to Draw a Rectangle.
Oval Tool Drag the left mouse button to draw area to Draw a Oval.
Ploygon Tool Draw Polygon Comment.
Cloud Tool Draw Cloud Comment.
Connected Lines Tool Draw Connected Lines Comment .
Pencil Tool Click and Drag with Pencil to draw freeform.
PDF 3D Drag the left mouse button to draw area to insert U3D into PDF.
Summarize Comments Summarize Comments into a Text File.
PDFill Object Properties Edit Current PDFill Object's Properties.

7. Drawing Toolbar:

Select to Edit Click left mouse button to enter the selection state to edit the selected object.
Use Saved Objects Save, Manage and Use the PDFill Objects
Draw Line Hold Left mouse button to create the first point. Move the mouse and release to create the second point.
Draw Arrow Hold Left mouse button to create the first point. Move the mouse and release to create the second point.
Draw Rectangle Drag the left mouse button to draw area to Draw a rectangle
Draw Circle Drag the left mouse button to draw area to Draw a  circle
Draw Callout Draw a Text with Arrow
Draw Signature Hold down the left mouse button where you want to begin drawing. You can release the mouse button, move the pointer to a new location, and continue drawing.
Draw Curve Select one curve type from the submenu of this Button
Draw Basic Shapes
Drag the left mouse button to draw area to Draw a basic shape
 
 
Curve Edit Tool Curve Edit Tool to edit a curve or point.
Curve Eraser Tool Curve Eraser Tool to erase a curve or point.
Line Style Line Style
Dash Style Dash Style
Arrow style Arrow Style
Transparency Transparency
Line Color Line Color. You can pick up a line color inside the page.
Fill Color Fill Color. You can pick up a fill color inside the page.
PDFill Object Properties Edit Current PDFill Object's Properties.

8. Align Toolbar:

Multiple Selection Button Must be selected before use
Align Objects Left Click at least 2 objects before use
Align Objects Horizontal Middle Click at least 2 objects before use
Align Objects Right Click at least 2 objects before use
Align Objects Top Click at least 2 objects before use
Align Objects Vertical Center Click at least 2 objects before use
Align Objects Bottom Click at least 3 objects before use
Space Objects Evenly Across Click at least 3 objects before use
Space Objects Evenly Down Click at least 2 objects before use
Make Objects Same Width Click at least 2 objects before use
Make Objects Same Height Click at least 2 objects before use
Make Objects Same Width and Height Click at least 2 objects before use
Move or Duplicate selected Objects accurately with offset in X and Y Click at least 1 objects before use
Delete selected objects Click at least 1 objects before use
Move Selected Objects Left by One Point Click at least 1 objects before use
Move Selected Objects Right by One Point Click at least 1 objects before use
Move Selected Objects Up by One Point Click at least 1 objects before use
Move Selected Objects Down by One Point Click at least 1 objects before use
Group selected objects into a one group object Click at least 2 group-able objects before use.
ungroup the selected grouped object Click 1 grouped object before use
Lock all the selected objects Click at least 1 objects before use
Unlock all the lock objects in this page No need to select
Properties for Selected Multiple Objects Click at least 1 objects before use

9. Ink Toolbar:

Click left mouse button to Select and Edit Non-Ink PDFill Objects
Insert Ink using Pen Mode
Insert Ink using Marker Mode
Insert Ink using Highlighter Mode
Ink Selection Mode
Ink Deletion Mode
Undo Ink
Redo Ink
Ink Color
Ink Width
Pressure-Sensitive Pen (Supporting hardware required)
Auto Smooth Free Hand to Straight lines
Set Ink's Default Properties Properties

10.  Navigation Toolbar:

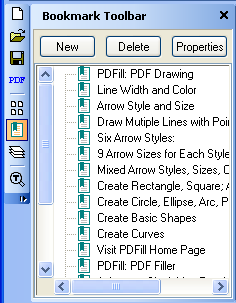
Thumbnail Toolbar Bookmark Toolbar Layer Toolbar Search Toolbar

PDFill Copyright 2002-2022 by PlotSoft L.L.C..  All rights reserved.