|
Free
PDF Editor Online Tools 9:
Convert
Images to PDF
Online
Select Image Files (bmp, png, gif,
jpg/jpeg, tif/tiff, wmf) to PDF (5M, 10 Files)
Free PDF Editor Desktop Tools
9:
Convert
Images to PDF
on
Desktop
This FREE PDF Tool
is a free Images to PDF Converter.
It is a quick,
simple and easy-to-use but free PDF utility that is designed to convert
image files into PDF document. Just add image files like JPG, JPEG, BMP,
PNG, TIF, TIFF, GIF and WMF formats with the options of page size, page
margin and image layout. You
need to create images first. For example, you can use a scanner or digital camera to
get your images.
Here are
the steps on how to
Convert Images
to PDF:
1.
Choose Free PDF Tools > Convert Images to PDF

2. The Convert
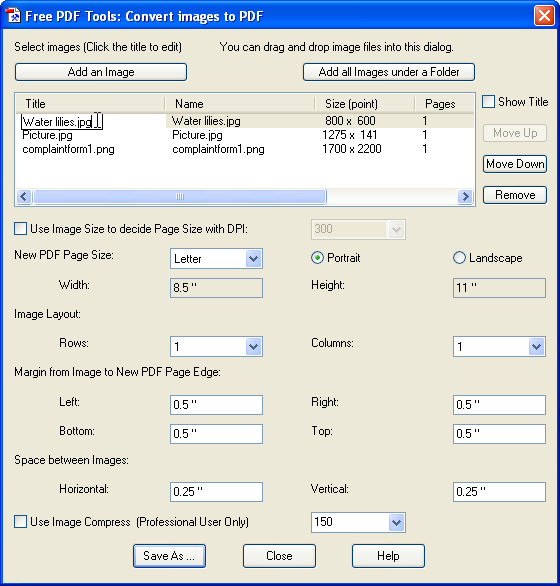
images to PDF dialog box comes up:

- Select image files (bmp, png,
gif, jpeg, tiff and wmf).
Press Ctrl Key to select multiple image files in the File
Selection Dialog.
- Click Add an Image to
add image files that you wish to convert into a new PDF file.
Each file�s title, name, size and location are displayed.
- Click Add all Images under
a Folder to add all the image files under that folder.
- Click the title to edit inside
the list box if you want to update the title.
- Click Show Title if you
want to show the title onto each image.
- To move a file up or down from
the file list, select the filename and click Move Up or
Move Down as needed.
- To remove a file from the file
list, select the filename and click the Remove.
- If you click Use Image Size
to decide Page Size with DPI, each PDF Page's size will be
decided by each image's size using
DPI (Dot per Inch). Only one image per PDF Page. This
function is useful when you want to insert an image into a
PDF Push Button.
-
Select Page Size and Orientation
for all the images.
-
Enter Page margin from edges.
-
Image Layout:
-
Select Columns and Rows in one
page.
-
Enter the horizontal and
vertical space between images.
- Use Image Compress with DPI.
The image is compressed using DPI. The default DPI is 150.
It is
only available for the registered user of PDFill PDF Editor.
3. Click Save As to have a new PDF file. The new file may be launched automatically if
you have installed Adobe Reader.
4. Do experiment
with the options available to see which best suit your needs. Click Close
to finish.
Batch (DOS) Command Support: (It is only available for the registered user of PDFill PDF Editor)
You can start a batch job in Windows by issuing the
execution command directly from the MS-DOS command prompt window without
opening the PDFill GUI.
Note: Please
put "" on your file name with space. Make sure all command is in one
line.
"C:\Program Files\PlotSoft\PDFill\PDFill.exe"
Image2PDF Image1 Image2 Image3 Output.pdf W H
row column
leftMargin rightMargin bottomMargin
topMargin horizSpace vertSpace
-showFileName 1 -defaultImageFolder "C:\Test\"
- Image1 Image2 Image3: You can have many Images as you
need. It can be just image files or folders. If Image(N)
is a folder, all the images files under this folder will be added;
If it is image file name without a folder path, the
-defaultImageFolder
option must be used.
- W H: Specify
new PDF's Page Width and Height in Point
- row column: Specify
Number of Rows and Columns that
appears in the new page.
- leftMargin rightMargin bottomMargin
topMargin: Specify the
distance from
Left, Right, Bottom and Top Edges of the Images to the PDF
Page's edge.
- horizSpace vertSpace: Specify the
horizontal and vertical space in Point between the
images.
- -showFileName 1: (Optional) Flag to show File Name. Default is 0
- -fontSize 12.0: (Optional) Font
Size. Default is 12.0. Font Name of Adobe's Time Roman Normal is
used.
- -defaultImageFolder "C:\Test\": (Optional) If set, there is no
need to add folder path on
Image1 Image2 Image3.
- Example:
"C:\Program Files\PlotSoft\PDFill\PDFill.exe"
Image2PDF
"Water
lilies.jpg" "D:\Test\" "Blue hills.jpg" "Winter.jpg" "Sunset.jpg"
"output.pdf"
612 792 1 2 9 18 27 36 18 36
-showFileName 1 -fontSize 12.0 -defaultImageFolder "C:\BatchTest\"
|

